
Remove FRP Unlock Tool 2026
for Samsung Exynos
Locked out of a Samsung Exynos phone after a factory reset? You’re not alone. Google’s Factory Reset Protection is doing its job well, maybe too well when you’re the legitimate owner and just need your device back. This guide walks you through using the Remove FRP Unlock Tool 2026 properly, starting with the one step everyone tends to skip: enabling ADB in Download Mode before you touch anything else.
What the Tool Actually Does
The Remove FRP Unlock Tool talks directly to your Exynos device over ADB and clears the Google account lock left behind after a reset, without wiping your personal data in most cases.
Why ADB in Download Mode Matters
ADB access has to be switched on inside Download Mode first. Skip this and the tool has no way to send commands to the phone, so the whole unlock process stalls before it even starts.
Chipset Covered: Exynos 1380
This walkthrough is built specifically around the Exynos 1380 chipset, common in several recent Samsung A-series models. Steps and partition behavior can differ slightly on other Exynos chips.
Who This Guide Is For
Written for device owners unlocking their own hardware and repair techs servicing customer devices with proof of ownership. This isn’t a workaround for stolen or unauthorized phones.
What’s Coming Next
From here, we’ll enable Developer Options and OEM unlocking, boot into Download Mode, flip on ADB, then run the Remove FRP Unlock Tool step by step until the lock screen is gone for good.
What Is the Remove FRP
Unlock Tool?
The Remove FRP Unlock Tool is a lightweight ADB-based utility built to strip Factory Reset Protection off Samsung Exynos devices without needing a full firmware reflash. Instead of wiping the phone and starting from scratch, it pushes a targeted set of commands through Download Mode that clear the Google account lock while leaving your apps, photos, and settings untouched in most cases. It’s become a go-to option for repair shops handling this exact scenario day in and day out.
Key Features of the Tool
Fast ADB-Based Bypass
Runs entirely over ADB in Download Mode, so there’s no need for a full ROM flash just to clear the FRP lock.
Data-Friendly Process
In most cases user data stays intact since the tool targets the FRP flag specifically instead of triggering a factory wipe.
Exynos-Specific Logic
Built around how Exynos partitions handle FRP data, so commands are tuned for this chipset instead of a generic one-size-fits-all script.
No Paid License Required
Works as a free tool for this method, unlike box-based solutions that need a subscription or credit system to run.
When You Should Use This Method
You reset the phone (factory reset, firmware flash, or repair) and now it’s asking for the previous Google account you can’t access anymore.
You’re a repair technician who just bought or received a device with proof of ownership from the customer, and it’s still showing an FRP lock from a prior owner.
You’ve forgotten the credentials to your own Samsung account and Google’s recovery options aren’t getting you back in.
Compatible Samsung Exynos Devices
Samsung Exynos 1380 FRP
Removal Overview
The Exynos 1380 handles FRP data a little differently than older Exynos chips, which is exactly why a generic bypass script won’t cut it here. This section breaks down why ADB access in Download Mode is the foundation of the whole process, how the removal actually works under the hood, and which Android versions and security patch levels this method has been tested against.
Why Enable ADB in Download Mode?
It’s the Only Entry Point
Once FRP kicks in, the normal home screen and Settings menu are locked out. Download Mode with ADB enabled is the one door that stays open for the tool to communicate with the device.
Bypasses the Setup Wizard Trap
Without ADB access, you’re stuck cycling through the Google account screen with no way to send commands. Enabling it in Download Mode sidesteps that dead end entirely.
Required by the Tool Itself
The Remove FRP Unlock Tool is built to detect and talk to the device specifically through ADB. No ADB connection means the tool simply won’t recognize the phone at all.
How This Method Works
Device Enters Download Mode
The phone is booted into Download Mode, which gives low-level access to the bootloader and partition data outside the locked Android UI.
ADB Connection Established
With ADB switched on, the computer and device can exchange commands even though the Setup Wizard is still locked on screen.
Tool Sends Targeted Commands
The Remove FRP Unlock Tool pushes a sequence of ADB commands aimed at the FRP flag stored in the device’s data partition, rather than touching the whole system.
Device Reboots FRP-Free
Once the flag is cleared, the phone restarts straight into the home screen setup, skipping the Google account verification step entirely.
Supported Android Versions
Supported Security Patch Levels
Requirements
Before Starting
Before you plug anything in, it’s worth getting your setup right the first time. Missing a driver or using a flaky cable is the number one reason this Exynos 1380 FRP removal stalls halfway through. Here’s exactly what you need on hand before you boot into Download Mode.
Required Software
Remove FRP Unlock Tool
The main utility that sends ADB commands to clear the FRP flag. Download it only from a trusted source and extract it to a folder with a short path (no spaces).
ADB and Fastboot Platform Tools
Google’s official platform-tools package. Most FRP tools bundle their own copy, but having a standalone version handy helps if you need to troubleshoot manually.
Updated Antivirus Exceptions
FRP tools often get falsely flagged by Windows Defender or third-party antivirus software. Add the tool’s folder to your exclusions before running it.
Required USB Drivers
Samsung USB Driver for Mobile Phones (latest version from Samsung’s official developer site).
Samsung Android ADB Interface Driver, which usually installs alongside the main USB driver package.
Uninstall any old or conflicting Samsung drivers first if this isn’t your first time flashing or unlocking a Samsung device.
Windows PC Requirements
Windows 10 or 11
64-bit versions of Windows 10 or 11 are recommended for the smoothest driver and tool compatibility.
Administrator Access
Run the tool as administrator. Driver installation and ADB communication can silently fail without elevated permissions.
Stable Internet Connection
Needed for downloading the tool and drivers, and useful in case the process requires an online verification step.
USB Cable Recommendations
Use the original Samsung USB cable if you still have it. Third-party cables are a common cause of random disconnects mid-process.
Plug directly into a rear USB port on a desktop rather than a front panel port or USB hub, which can introduce power inconsistencies.
Avoid cheap charging-only cables. If the cable can’t handle data transfer, ADB won’t detect the device at all.
Battery Level Recommendations
Prepare the
Samsung Device
With drivers installed and the tool ready to go, it’s time to get the phone itself into the right state. This part is mostly about patience: hold the right buttons, confirm the right screen, and make sure Windows actually sees the device before you run anything.
Boot the Device into Download Mode
Power Off the Device Completely
Hold the power button and select power off, or hold Power and Volume Down for 10 to 15 seconds if the screen is unresponsive. Wait a few seconds after the screen goes dark.
Press and Hold Volume Down + Volume Up
With the phone off, press and hold both Volume Down and Volume Up buttons together, since the Exynos 1380 models don’t use the power button in this combo.

Plug in the USB Cable
While still holding both volume buttons, connect the USB cable to your PC. The device should boot straight into the Download Mode warning screen.
Confirm With Volume Up
Press Volume Up once on the warning screen to continue into the full Download Mode interface, showing chip info and device status text.
Verify Download Mode Is Active
Check the Screen Text
You should see lines like “ODIN MODE” or similar Samsung download screen text, along with product name and current binary status.
Confirm Chip Info Shows Exynos
Look for the AP chip info line to confirm it reads Exynos 1380, not a different variant, since flashing tools depend on matching chipset behavior.
Check Knox Warranty Status
This screen also shows Knox Guard and warranty void status, worth noting before you proceed if you’re a repair tech documenting the device condition.
Connect the Device to the Computer
Keep the USB Cable Connected
Leave the phone plugged into the same rear USB port used earlier. Switching ports mid-process can force Windows to reinstall drivers.
Check Device Manager
Open Device Manager on your PC and look under Ports (COM & LPT) or Samsung Android Phone. You should see the device listed with no yellow warning icon.
Confirm ADB Recognition
Open a command prompt in your platform-tools folder and run adb devices. Your device’s serial number should appear in the list, confirming ADB is properly detecting it.
Enable ADB in Download Mode
Using Remove FRP Unlock Tool
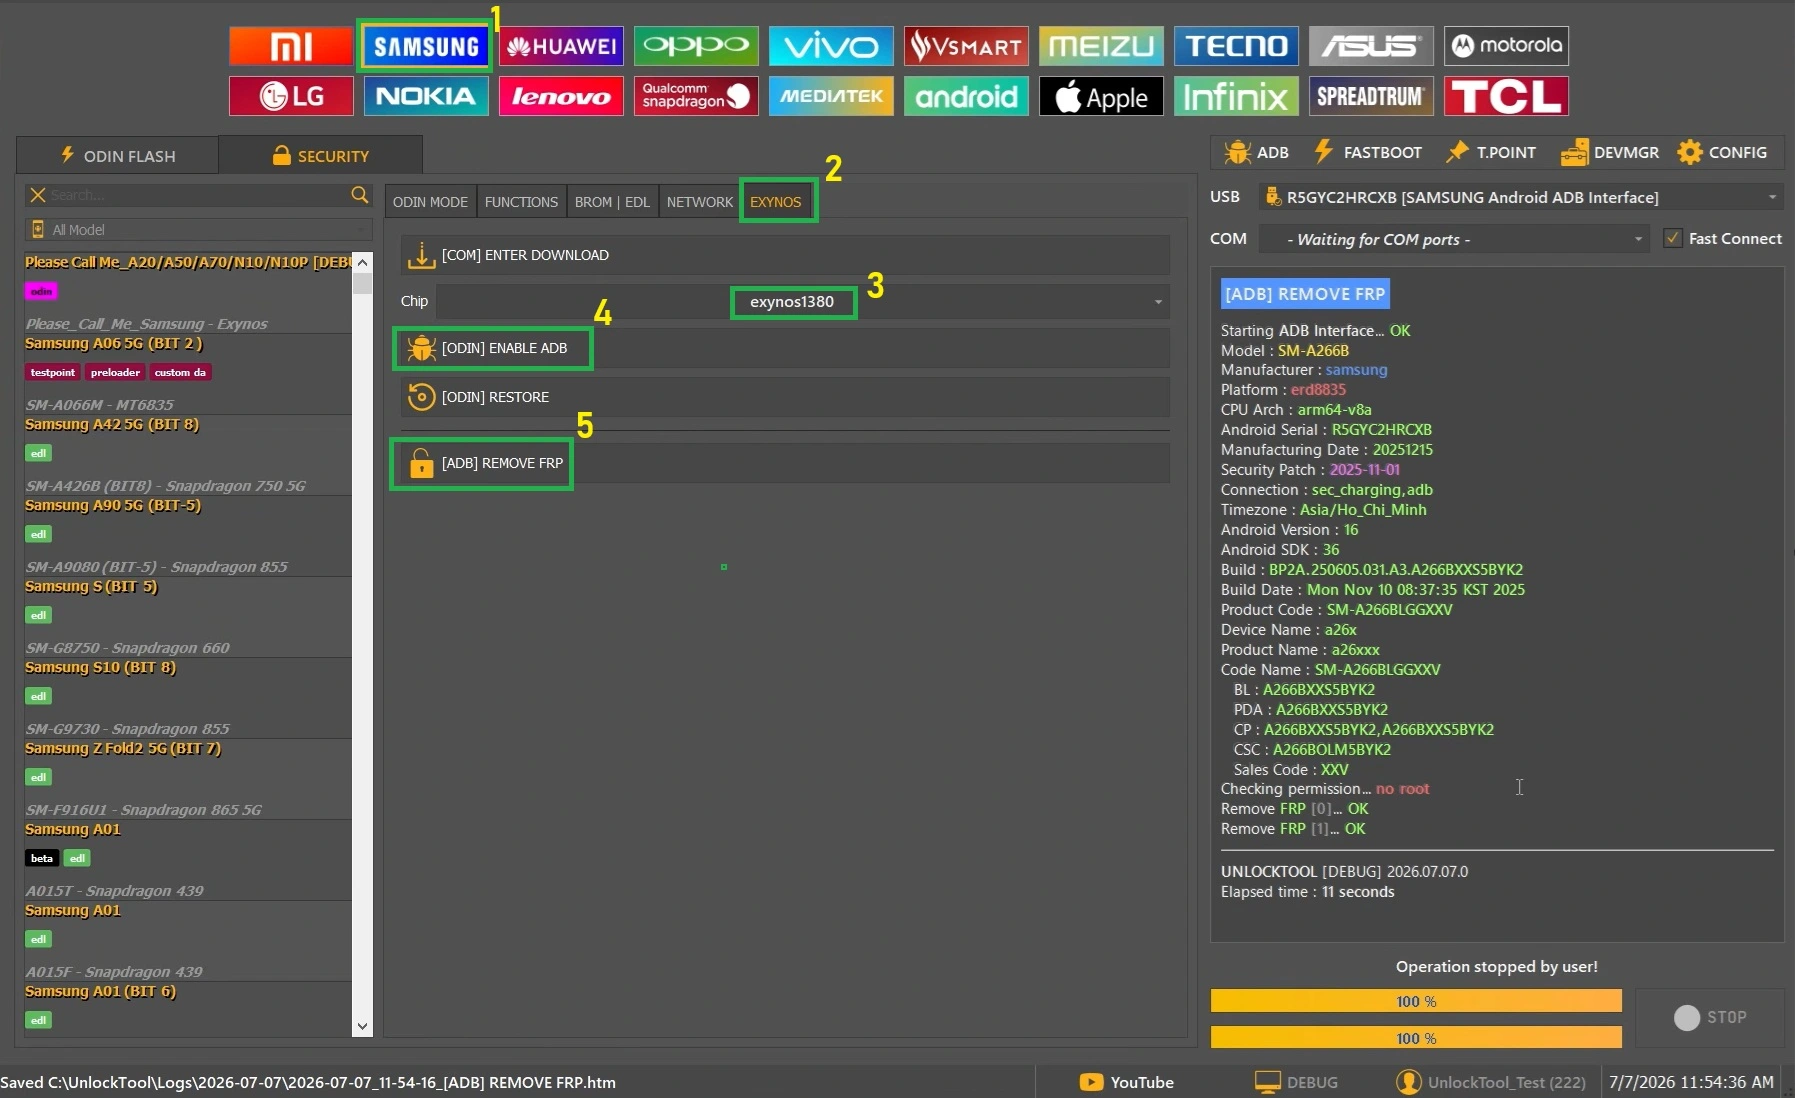
This is the core step that unlocks everything else. With the device connected and sitting in Download Mode, the Remove FRP Unlock Tool needs to push its ADB enable command through before it can talk to the Exynos 1380 and clear the FRP flag. Follow these steps in order and don’t skip the reboot wait at the end.
Open the Remove FRP Unlock Tool
Launch the tool as administrator from the folder you extracted earlier. Give it a second to initialize, the main interface should load with a list of supported brands on the left panel.
Navigate to the Samsung Section
Click on Samsung from the brand list. This filters the tool’s menu down to Samsung-specific options, including the Exynos and Qualcomm chip categories.
Open the Exynos Menu
Inside the Samsung section, select the Exynos submenu. This separates Exynos-based models from Snapdragon ones since the ADB enable commands differ between the two.
Select the Exynos 1380 Chipset
Choose Exynos 1380 from the chipset dropdown. Picking the wrong chipset here is one of the most common reasons the ADB enable command fails to apply.
Click Odin Enable ADB
Hit the Odin Enable ADB button. The tool will detect the device in Download Mode and start pushing the ADB enable payload, shown as a progress log in the tool’s console window.
Wait for the Device to Reboot Automatically
Once the process hits 100%, the phone reboots on its own. Don’t unplug the cable or touch any buttons during this reboot, ADB access is being applied in the background as it restarts.
Remove FRP Lock
Through ADB
With ADB access enabled and the device back up after its reboot, you’re now ready for the actual FRP removal. This part goes quicker than the previous step since the tool already has an active ADB connection to work with. Just don’t rush the wait time, that’s where most of the real work happens in the background.
Return to the Exynos Menu
Back in the Remove FRP Unlock Tool, go to Samsung, then Exynos again, with the Exynos 1380 chipset still selected from before. No need to reconfirm the device connection manually, the tool should still detect it.
Select ADB Remove FRP
Click the ADB Remove FRP button in the menu. This triggers the tool to send commands over the ADB connection you just enabled, targeting the FRP flag directly.
Wait for the FRP Removal Process to Complete
Let the progress log run without touching the cable or the device. This usually takes one to three minutes on the Exynos 1380, and the phone may flicker its screen or reboot briefly on its own during this window.
Verify That FRP Has Been Successfully Removed
Once the tool shows a success message and the device reboots into the setup wizard, check that it skips straight to Wi-Fi setup instead of asking for a previous Google account.
Setup Wizard Starts Normally
The phone should boot directly into Wi-Fi setup or the welcome screen, with no prompt asking for a previously synced Google account.
Google Account Setup Is Skippable
When you reach the account step, you can add a new Google account or skip it entirely without being blocked by an old credential check.
Settings Menu Is Fully Accessible
Once setup finishes, open Settings and confirm you can reach every menu normally, a sign the FRP flag was cleared and not just temporarily bypassed.
Complete Device Setup
After Unlocking
FRP is cleared, but you’re not quite done yet. How you handle the next few screens matters, especially if you want to avoid the device re-triggering an account check. Here’s how to walk through the setup wizard the right way after using the Remove FRP Unlock Tool.
Initial Device Boot
Let It Boot Fully on Its Own
Give the phone a full minute or two after the FRP removal finishes. The first boot after unlocking tends to run a bit slower while the system rebuilds cached app data.
Select Language and Region
You’ll land on the standard language selection screen. Pick your language and region as normal, this part behaves exactly like a fresh out-of-box setup.
Insert a SIM Card if Needed
If a SIM prompt appears, you can insert one now or tap skip. This step has no effect on FRP status either way.
Set Up the Device Without Connecting to Wi-Fi
Skip the Wi-Fi Screen
When prompted to connect to a network, tap Skip instead of joining Wi-Fi. Connecting too early can trigger Google to re-check the account status before setup finishes.
Continue Through Remaining Prompts
Keep tapping through date, time, and terms screens without Wi-Fi active. Most of these steps don’t require an internet connection to proceed.
Reach the Home Screen First
Get all the way to the home screen before connecting to any network. Once you’re there, FRP has effectively been bypassed for good on this boot cycle.
Confirm Normal Device Operation
Connect to Wi-Fi now that you’re on the home screen and confirm the connection holds without kicking you back to a verification screen.
Open the Play Store and sign in with a Google account (new or existing) to confirm app downloads and account sync work normally.
Check Settings, About Phone, and make sure the device isn’t showing any lingering FRP or Knox warning flags.
Restart the phone once more as a final test. If it boots straight to the lock screen or home screen without asking for a Google account, the unlock held successfully.
Troubleshooting
Common Issues
Even with drivers installed and the right chipset selected, the Exynos 1380 can still throw a curveball or two during ADB enable or FRP removal. Here are the issues we see most often with the Remove FRP Unlock Tool, and the fixes that actually resolve them.
Device Not Detected by the Tool
Reinstall the Samsung USB driver and confirm Device Manager shows no yellow warning icon. Try a different rear USB port on the PC, and switch the cable if you’re using anything other than the original Samsung one. If the tool still doesn’t see it, close and reopen the tool as administrator after reconnecting the device in Download Mode.
ADB Does Not Enable Successfully
Double check that Exynos 1380 is selected, not a similar-looking Exynos variant. Unplug the cable, reboot the device back into Download Mode, and retry the Odin Enable ADB step. Also confirm no other ADB or Odin-based tool is running in the background, since two programs competing for the same COM port will block the connection.
Odin Enable ADB Option Fails
This usually points to antivirus software quietly blocking the tool’s driver communication. Add the tool’s folder to your antivirus exclusions list and temporarily disable real-time protection, then retry. Running the tool as administrator solves this in most remaining cases.
Device Stuck in Download Mode
Hold Volume Up and Volume Down together for about 10 seconds to force a restart out of Download Mode. If that doesn’t work, hold the same combo along with the USB cable unplugged for 15 to 20 seconds. The device should reboot normally once power cycles.
FRP Lock Still Appears After Reboot
Go back into Download Mode and repeat the Odin Enable ADB step first before running ADB Remove FRP again, since the ADB connection may have dropped before the flag was fully written. Also make sure you skipped Wi-Fi during setup as instructed, connecting too early can cause Google to re-trigger the account check.
Important Warnings
and Best Practices
The Remove FRP Unlock Tool works reliably on the Exynos 1380 when you follow the process correctly, but a few careless shortcuts can turn a routine unlock into a much bigger headache. Keep these points in mind before, during, and after every job.
Back Up User Data Before Any Service
Most FRP removals leave data intact, but nothing is guaranteed once you’re pushing ADB commands to a locked device. If the customer or the device owner has any way to back up photos, contacts, or files beforehand, do it. Treat every FRP job as if a factory reset is a real possibility, not a worst case you can rule out.
Use Only Supported Samsung Exynos Models
This method is built around the Exynos 1380 specifically. Running the same steps on a different Exynos chipset, or worse, a Snapdragon variant of a similar model, can send the wrong commands to the partition and cause real problems. Always confirm the chip info on the Download Mode screen before selecting anything in the tool.
Keep the USB Connection Stable During the Process
A dropped connection mid-flash is one of the few ways this process can genuinely go wrong. Use a solid USB cable, plug into a rear port instead of a hub, and don’t move the phone or laptop while the tool is actively communicating with the device. If you need to step away, wait for a step to finish first.
Perform FRP Removal Only on Devices You Own or Are Authorized to Service
This guide is written for legitimate use cases, personal devices you’re locked out of, or customer repairs backed by proof of ownership. Using this method on a device that isn’t yours, or one you don’t have clear authorization to service, isn’t something this tool or this guide is meant to support.
Advantages of This
FRP Removal Method
There’s more than one way to strip FRP off an Exynos device, but the Remove FRP Unlock Tool workflow stands out for a few solid reasons. Here’s what makes it worth choosing over more manual or command-heavy approaches.
No Manual ADB Commands Required
Everything runs through buttons in the tool’s interface. You don’t need to memorize or type out ADB command strings, which cuts down on typo-related failures.
Fast and Technician-Friendly Workflow
From Download Mode to a cleared FRP flag, the whole process usually wraps up in a few minutes, making it practical for shops handling multiple units a day.
Minimal User Interaction
Once Download Mode is active and the cable is connected, most of the work happens inside the tool itself, with just a couple of clicks needed from start to finish.
Suitable for Supported Exynos Devices
Built specifically around chips like the Exynos 1380, so the commands sent are tuned for that hardware instead of relying on a generic bypass that may not hold.
Frequently Asked
Questions
It’s an ADB-based utility that clears the Factory Reset Protection flag on Samsung devices, letting you get past the Google account verification screen without a full firmware reflash. You can grab the latest version from downloadunlocktool.com.
Models built around the Exynos 1380 chipset are supported, including devices like the Galaxy A34, A54, and F54. Always confirm your exact chip info on the Download Mode screen first.
Yes, that’s actually the whole point of this method. The Remove FRP Unlock Tool pushes an ADB enable command specifically while the device is sitting in Download Mode.
It’s been tested and confirmed working on Android 13 and 14 builds running One UI 5.1 and 6.0. Newer major Android versions may need an updated tool release.
It works reliably up through the January 2025 security patch. Devices running patches from March 2025 onward aren’t guaranteed to work with this specific method.
Without it, the device has no active ADB connection for the tool to communicate through. It’s the step that opens the door before the FRP removal command can actually be sent.
Reinstall the Samsung USB driver, switch to a rear USB port, and confirm Device Manager shows no warning icon next to the device. Reconnecting in Download Mode after that usually fixes it.
Yes, and it’s actually recommended. Skipping Wi-Fi during setup until you reach the home screen helps prevent Google from re-triggering an account verification check.
In most cases user data stays intact since the tool targets the FRP flag specifically rather than triggering a factory wipe, but backing up data beforehand is still smart practice.
You’ll need the Samsung USB Driver for Mobile Phones along with the Samsung Android ADB Interface Driver, both available from Samsung’s official developer site.
It’s not recommended. Selecting the wrong chipset in the tool can send commands that don’t match the device’s actual partition layout, so always verify the chip info first.
Go back into Download Mode and re-run the Odin Enable ADB step before trying ADB Remove FRP again, since the connection may have dropped before the flag was fully cleared.
Conclusion
Getting locked out by FRP feels a lot worse than it actually is once you know the right sequence. The Remove FRP Unlock Tool takes what used to require manual ADB commands and turns it into a straightforward, repeatable process built specifically for the Exynos 1380.
Summary of the FRP Removal Process
→
Boot Download Mode
→
Enable ADB
→
Run ADB Remove FRP
→
Skip Wi-Fi & finish setup
Once ADB is switched on inside Download Mode, the actual FRP removal only takes a couple of minutes on the Exynos 1380. The trickiest part is really just getting drivers and the ADB connection right the first time, everything after that is mostly waiting and confirming.
Final Recommendations Before Servicing Additional Devices
Keep the Tool Updated
Samsung ships security patches regularly, so grab the latest version of the Remove FRP Unlock Tool before each new batch of devices to stay compatible.
Always Confirm Chipset First
Make it a habit to check the AP chip info on the Download Mode screen before selecting anything in the tool, especially across a mixed batch of Exynos models.
Document Ownership for Repair Jobs
If you’re running this as a repair tech, keep a simple record of proof of ownership for each device you service. It protects you and keeps the work legitimate.